Sunday, March 26, 2017

Weeds or Wishes


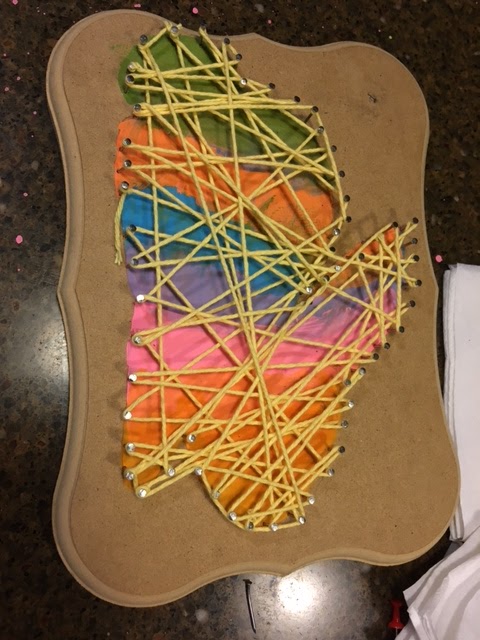
It's a ways down here, but I promise, you will learn how you can do the above wall hanging. :)


Well, a few days last week were spent with a sick set of kiddos all battling stomach flu or bummer fevers.

The evenings seemed to pick up their spirits a bit until the next morning when long evenings of coughing and upset stomachs brought along morning blues and another round of sick days.

Though it was great for them, I am sure, to have a day off of school, I was struggling at home to make phone calls to get my store that I manage covered for the day so I could stay home and get my children feeling better.

Luckily for me, and to the absolute depths of my gratefulness, another manager was able to re-arrange her store to make it possible for her to come to my store and cover the shift I would be missing. I was very appreciative, but my seven year old was even more grateful. So as the day went on and she was feeling a little better... and a lot bored... be decided to make a gift for the manager that was kind enough to take over my shift for me.

So began our adventure into string art.

We hunted around the internet and landed on some bunny favorites for the Easter holiday coming up.

With some wood scraps and old wooden plaques I had at home, we started by planning the designs on the kids' plaques and the gift one.

The kids all chose bunnies for their shapes.  After painting their shapes onto the wood, they hammered nails into the edges of the of the designs. 


Then they tied the strings to the nails and wrapped them all around each of the nails. Some of the nails a few times. 


With a thank you note, my seven year old sent her peep string art off to my co-worker to thank her for the assistance of the day to take care of my kiddo's. :)

So with the kids all done, it was time for me to get my own project done.


So I used my wood piece and grabbed some paper to trace around the cup that I felt was going to be the right size circle. I traced around it and cut it out for a pattern. 


I then placed the circle at the center of the wood and nailed around 3/4 of the circle. I also found later that I needed a series of nails in an inner circle of the larger circle I made... sorry, I completely forgot to take a photo of it. :(


Next, I placed three nails the lower left  corner of the wood panel,and three groupings of five nails at the top right portion of the wood panel.


Starting with the green yarn, I ran long lengths from the bottom three nails back up to one nail I had chosen on the bottom "corner" section of my nail circle. Then beginning at the middle smaller circle, I tied the white yarn to one nail and worked back and forth, making sure I didn't create a pattern with the looping between the nails until a 3/4 "sun" shape was created. I tied off the string and cut the excess. than did the same with the five nails at the top.


Using foam stickers I had in my craft cabinet, I chose the letters needed to make the words I wanted on my panel


And traced around them to create the outline of the words I wanted. For this project it was "some see weeds... Others see wishes".


I then painted in the lettering and waited for it to all dry and hung it up on my wall! :)

If you would like to try this project, please send me photos when you are all done. 

Would prefer to create something like this with a group? I offer in-studio and traveling sessions! you can contact me today through my website at www.oakgrovecalicocrafts.com

Don't for get to subscribe and share this fun project. 

Until next time, happy calico crafting!

Monday, February 20, 2017

What the Heck is in This Drawer?

As I have mentioned previously, my mother passed away nearing two years ago.  Part of what I took with me into my home, upon her leaving us here on earth, was a large collection of items from her craft room. I have piles upon piles of papers in every color, theme and size. I will be able to color and paint until I leave this earth. I LITERALLY moved a U-Haul of her stamps, paper, scissors, storage cabinets, glitter, rhinestones, paint, and more.  I am certainly trying my hardest to honor my mother's memory by using the supplies to create things that I think she would have loved to have shared with me if I were to have visited her and done a project with her.

But then there is this drawer.... what the heck was in this drawer?


I have to admit, that my mother did have a tendency to hoard lots of scraps of paper and pieces of things that I wasn't sure she would ever really use. As much as I brought home, I probably also threw away in equivalent amounts of recyclables. So it wasn't too surprising to me to see this pile of what seemed like just scraps of paper to me. But upon closer inspection, I saw that these strips were intentional. They were even packaged up just like this for some reason. So I started looking at the other things I found in the drawer and realized just what this was for: QUILLING! 

Quilling is a art form I have never learned, but now that I had a few of the tools and the l instructional sheets about it, I thought I could give it a try.

Qilling is also known as paper filigree and it is an art form that that involves the use of strips of paper that are rolled, shaped, and glued together to create decorative designs. 

A quick look at Pinterest and You tube brought me a number of instructional videos and articles that I thought would be helpful for beginners and I was ready to try it out!

I have no idea what any of this stuff is called, so please bear with me as I learn a these things too. :)

There are a few things that seem necessary when quilling: paper strips (obviously), a small needle typetool to wind the quilling papers on, a comb or pick (wide toothed), liquid/fast drying glue, a foam block, pins or needles, and a scissor.

Some other things I have found in my mom's collection that have been useful: a fringing tool, a paper shredder for do it yourself quilling strips, and a painter's guide that helps you measure circles. 


So this is where I started. :)

The first thing I tried was to make a quilled mosaic heart. I figured a heart was a pretty open shape and that I could try my hand at a number of quilling techniques this way. 


I actually started out with just normal glue sticks, but found those didn't work so well. The glue was hard to control on small spaces and not concentrated enough to really work out a standing shape with the quilling paper. So, off to Michael's I went to grab some liquid glue with a fine tip applicator. 


With the glue back in hand, I could work on getting these pieces put together to try to fill the heart with different techniques and shapes.


I rolled, glued, released the coils and shaped a number of different techniques until I had a few crescents, tear drops, loops and more.

And then I filled them all into this heart.

I have to admit, I have a ways to go with this, but I was overall very happy with the final results. :)


I tried a few other things too.

Making a Butterfly:


And then some flowers and foliage.


I even had my seven year old in on the fun for a while as we figured out how to make a butterfly for her. 


I now hope to get these techniques down and offer them soon as classes and art from my studio. My interim goal is to now take these techniques and learn now to make snowflakes so I can make a nice piece to hang in my YOU NEED ART THERE (see previous blog) area of my stair well as my winter piece.

Well, that is it for now, friends. 
Please follow, comment, and try it yourself and send me a picture of your attempts! I look forward to sharing again!

Check out my website for opportunities for you to get art, handmade gifts, custom wine glasses and more!

www.oakgrovecalicocrafts.com 

UNTIL NEXT TIME! 

Monday, January 9, 2017

Frosty Cakes

I manage a formal wear shop in the Twin Cities. Each holiday season, I like to find fun/inexpensive ways to treat my staff to treats throughout the season. This year, I brought in a little elf to help me out with the gift giving. 


As a part of this, one of the things that the elf delivered was a little pack of these cute snowmen with snowball bellies. 

These are a fun and inexpensive way to give a little winterized gift to your pals or office mates. Here is how they are done! 


You will need:
double sided tape
glue dots
white cardstock
red paper
black paper
pastel chalks
black pen/marker
hostess cakes (in singles packages)


Using the papers, I cut the white cardstock into a shape using this following base and editing it to a shape I liked for the snowman's face. I found the below template on http://www.cliparthut.com/


With the red paper, I cut out mitten and scarf shapes. With the black, I created a top hat shape.


I added some detail to the scarves by placing little lines and fringe onto the scarf with black marker. 


Using the edited frame template, I folded it in half and then added a face to one side of the frame. To add cute little rosey cheeks, I used my scrapbooking chalks to add a little blush to the cheeks. I drew a face onto each one and attached the top hats with double sided tape. 


Then, using the double sided tape, I added the scarf to the back side of the face. 


Folding over the frame template, I added double sided tape to the back of the face and to the other side of the folded frame. Placing the snowball cakes in between the front and back of the folded frame, I pressed each of the sides onto the cakes.

Using the glue dots, I added the mittens. 


And VIOLA! There you have it! a little snowman with a snowball cake belly!

Try it out and be sure to share the photos with me.

Don't have time to make these, but want to give them as gifts? I have a website and will work on any commission-able works you would like to have done! 


LIKE, FOLLOW, SHARE