Monday, October 29, 2012

Pumpkins, Pumpkins, PUMPKINS!!!

So it is finally pumpkin carving day!


To start, here are my kids' creations. They were very proud and I need to show it off for them.

I haven't carved my own for two or three years because We always went over to my parents' home with the kids and so hanging out at their house for hours carving my pumpkins while my kids run wild.

Instead, I have just assisted with their creations. So I thought that since I am home this year and can spend my own time on it, I was gonna do it UP! :)

The first thing is that I always want to do a pumpkin that is really detailed.

The thing is, when I carve a pumpkin all the way through and "punch out" the pieces, then the integrity of the walls of the pumpkin get more and more fragile until it falls in on itself OR just can't glow through the image well enough.

SO.... this is what I do:

Other than a big spoon to take all the "guts" out, I only need a pen, a sharp small knife and a pumpkin cutter. 


I look for coloring pages to start out. These are easiest because they will have a black and white outline that is easy to use. I found this one, but wasn't so thrilled with her. I knew I could alter her though to look like i wanted. 


Here she is with the outline of the changes I wanted to make on her in pen.


I then place the paper on the pumpkin and start punching tiny holes in the perimeter of the outlined drawing. The more I keep the holes close together, the easier it will be to put together the image to carve out. 


Then I outline the image I made in pen so I can see it on the pumpkin and then edit or add any details I want. in this case, I made it so she was sitting on a tree in the moonlight.


Then VERY carefully, as to save all my fingers, I start to peel away the top most layer of the pumpkin shell. In this way, I can keep a lot of tiny details in the image without having to risk the strength of the pumpkin wall as much as if I were to cut all the way through. I also, then, don't have to think about the pieces "floating" in mid-air if I were to cut away the wrong negative spaces. 


Here she is getting closer to looking complete. This is about 2 hours into the carving of the image.


I am fairly happy at this point with the image, but if you put a candle or pumpkin light into the pumpkin, the walls are too thick to see the light shine through. 


This is when I carefully, and checking often, score out the inside "meat" of the pumpkin until the wall is thin enough to glow through. 


 This year, I really wanted her to shine... literally! So I cut a small slit in the back of the pumpkin and put Christmas lights inside.  HERE IS THE FINISHED PRODUCT!

Now for clean up... UGH...

HAPPY HALLOWE'EN ALL!


Wednesday, October 24, 2012

Kitties, Owls, Pumpkins, Cake and..... SWORDS??

So after a mommy's day off yesterday (still recovering from the piles of laundry, dishes and mess), I decided to finish off the last of my costuming for the Hallowe'en holiday and get crafting with the kids.

I have been trying to keep the house active with holiday crafts as my littlest (she is three) is asking every night as soon as it is dark enough if it is Hallowe'en yet.

To help ease the blow each time I tell her "no", I have started trying to get crafts together every few days until the day finally arrives.

A few days ago we made a candy house from a kit that i bought on CLEARANCE last year. The nice thing about those is that candy really takes a long time to spoil and when it is all vacuum sealed and solid sugar, it can be purchased for the following year without too much possibility of spoilage. I always prepare for the possibility that there may be bad icing in it that won't hold together, be too runny, or way too thick, so I was ready to make my own. turned out this stuff wasn't too bad though, so we used it.  Like their mother, though, the kids couldn't do a kit just as is, so they added a graham cracker chimney, fence, and walkway. I am proud.  Now just to keep the three year old from eating it before Hallowe'en is over.


At JOANN FABRICS on Monday, I used an awesome moonlight madness coupon for 30% off AND all the great sales and scored some AWESOME shopping deals for the season. Some that I put away for next year too. (Ultimately, I am super proud to say that of my $229.00 in purchases, I only paid $60.00!)

One of the fun things I grabbed to use this year was these MARTHA STEWART pinwheel folded paper decorations that looked easy enough for the kids to put together. So Sammi took the Pumpkin, Terra took the owl and Aubrey had dibs immediately on the Kitty.

I think that they are a pretty good addition and with 50% off Martha products and another 30% off that, they barely cost a dime! I think I will figure out how to craft them next year so we can make more.


With the kids in bed (well, sorta, I can still hear them ratin' around), I have turned my attention to finishes on a few costumes that I need to complete. I have one mermaid tail, a He-Man Sword and shield, and a saloon girl train/bustle to finish. Then I am done! :)


I think of all my challenges with costumes this year, He-man is my biggest. This costume is for a four year old who loves to watch old videos with his dad and really got into He-man himself. The trick??? NO ONE makes a He-man for kids. I mean, the TV show is like 25 years old, so finding an adult one is really your only hope. As a kid, I was a big fan of He-man and She-Ra myself, so I couldn't let the kid go without his hero costume. I knew this one pretty well, so I said I would give it a shot.... the trick though... the muscles and being as close to the illustration as possible in just a two week window. MUSCLES... very important and the specific design and style of the shield and sword, also would be a plus.


So here is the toy I found to use as an example, and here is the finished product. (It totally looks LAME on the dress form. I promise it is way more bad*$$ on Alex!)


Now for the weaponry... yeah, it is violent... WHATEVER! You can't have a decent He-man without the sword .. and by the power of Grayskull, I was gonna make it happen darn it! The shield is also a big giveaway for those who know He-man and would help people know what his costume was.

So, though I lost part of my thumb in the process, I sculpted the sword and shield out of floral foam and pulped mold-able  paper mache.

Today they were finally dry and I could paint them for Alex and his family to pick up on Friday when it is all dry! :)


And finally with the kids down for the night, I tested out my bars that I made for tomorrow's candidate forum. The St Francis Women of Today make the refreshments and treats for the event.  

I have this great cookbook that I use almost religiously when events like this come up: the HOPE cookbook from Isaac's Journey (www.isaacsfoundation.org). If you haven't heard of Isaac's Journey, you must not talk to me much because this is a passion of mine. 

Isaac's Journey was founded by a now very good friend of mine who lost her two year old son a few years ago to cancer. She has since made an amazing foundation from this tragic loss and is raising money for childhood cancer research and awareness.  My Friend, Linda, along with her foundation team have raised more than $110,000.00 for the University of Minnesota for their research in childhood cancer.  I am so fortunate to know her. She is so much more amazing than she knows!

*TEARS* 

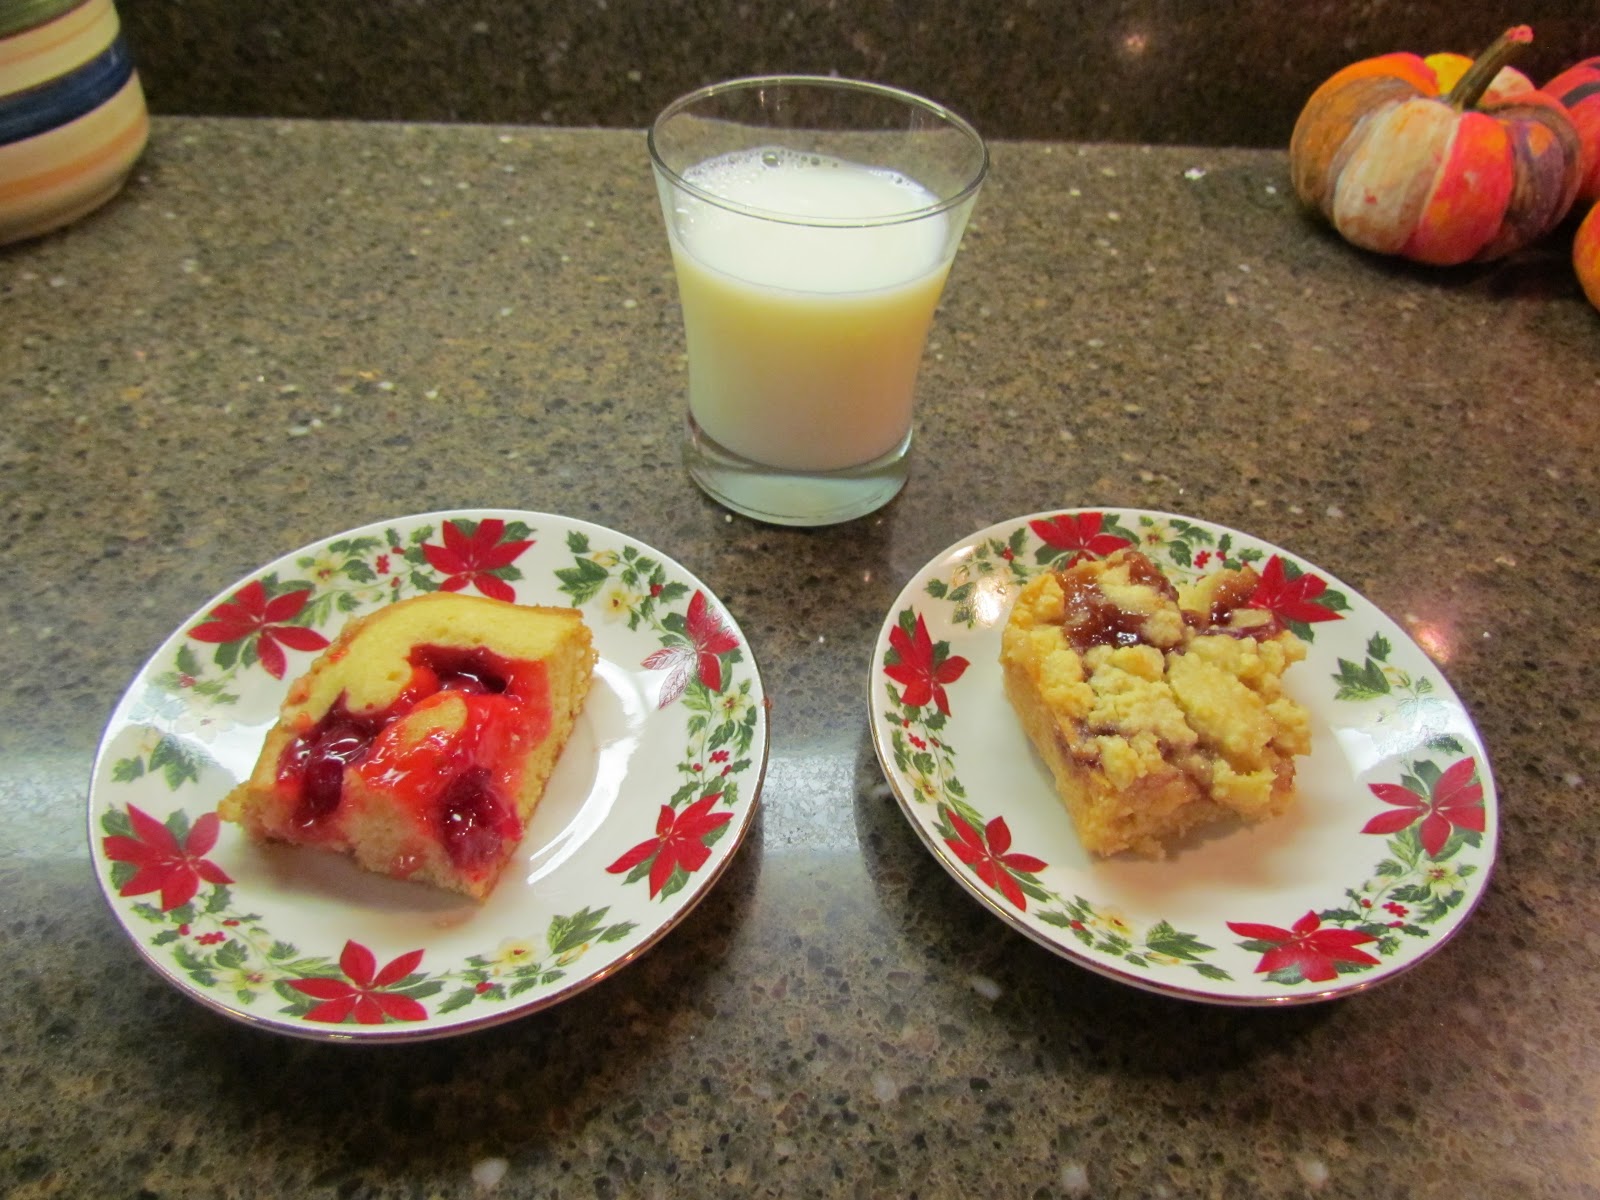
But anywho.....page 44 has the most yummy raspberry almond jam bars. YOU WILL LOVE THEM.  I made those and then revamped the recipe to make a similar bar with cherry pie filling and the same batter, but without the shortening. They were a little more cake like, but still totally yummy.

Go check out her website and buy the cookbook. If you only ever own one... this is it!


So I enjoy a square of each bar with a glass of milk and finish this blog for the evening.... TO LINDA and ISAAC! 


Until next time! :)


Monday, October 22, 2012

Funkin Pumpkin Floral Arrangement

OKAY! So here goes, my first attempt at blogging a step-by-step for a craft I did tonight.

I saw these GORGEOUS, HUGE, AWESOME, pumpkin floral arrangements at MICHAEL'S today. They were like 100.00 event at 50% off ... A little out of my budget and besides that, I would want to make one. DUH. To my complete sadness, they didn't have the huge funkins anywhere, so I settled for a little more budget friendly version tonight.


Let's Start with the supply list:
I purchased a craft pumpkin at 50% off at Micheal's today....
BEWARE: if you get one and have brought any of your children along, they will want one too. This can be a good or a bad thing depending on how you look at it: I got them each one and then I could do this craft myself while they decorated their own, but I also then had to buy three extra!
 I also purchased, in their clearance bins outside the store, 60% off stems of flowers, cattails, and leaves. I also got this cute little scarecrow pick. (I let my youngest pick her favorite one.) 

In my craft stock at home, I also have a basket of floral and styrofoam . I often use white foam from boxes or packing to fill in areas in a floral arrangement where I know I won't be sticking floral stems in, but will need filler or support. 

Spool of wired ribbon. I had this from last year's CLEARANCE sales and it was tucked in my boxes! :)


I then cut, just like I would a real pumpkin, a zig zag cover out of the top and took the top off. I used a serrated knife, but the craft pumpkins are made to be usable with the usual safety pumpkin craft cutters. I was just too lazy to dig mine out. 


I then filled it to the level top with styrofoam and floral foam. 


Starting with the first stem of fall leaves, I begin to build the base of the arrangement. I am planning on making this one in a triangular shape, so the first stem I place is the tallest one I will want for my base leaves. I always start with the "greenery". (or in this case, the orangery??) This stuff ends up being the filler of the arrangement and often the least expensive floral you will buy. It fills the bulk of the arrangement and covers up the visible stems everywhere that would show of all the flowers without it. 


All filled in with "greenery"


Then I used this flower stem. I liked it because of the grasses in it. 


I cut each stem of the bunch into separate pieces: The grass, then the two different flower stems on that smaller bunch.


 I started with the grasses and filled them into the arrangement first, then trimmed them down so the grasses weren't so overwhelming. The photos show it before I trimmed it down and after.

I then filled it in with the cut flowers. I, again, start with the flowers that are less expensive and will make the best fillers. These are the ones that will have the biggest blooms outward and fill in the most space. 


 I then took these lantern flowers to place in for height and shape, as you can see in the individual cut stem, I could bend and shape the stem to give more specific shape to the arrangement.


And finally the cattails. These are for sharpness and contrast. The cattails will give a different dimension to the arrangement making it feel much more complete, in my opinion. 

Here it is with all the floral pieces in place: the cattails, lanterns, carnations, grasses and leaves. Now is a good time to take a look at the the arrangement from all sides to see if there is balance and any spots that need to be filled. Then I usually, just as a general rule, remove one item. This is just to be sure I am not overloading the arrangement. I often have the "waste not" mentality and use every stem when I could have a lighter arrangement without a few pieces. This step is always just a self-check that makes sure I only put what the arrangement needs in it. 


Then Aubrey's scarecrow goes in.

I made sure to place him slightly off center so that the balance won't be off. I know it sounds counter intuitive, but putting him smack dab in the middle would have made it so that ANYTHING off about the arrangement as far as even-ness goes would be glaringly obvious. This way, the arrangement takes a little more natural look to it instead of a straight up triangle shape.  


 MAKING THE BOW.
I learned how to make a bow from my Grandma Wistrand (my mother's mother). Below are the steps.

Wrap the ribbon around in  loops around as many times as you want for the  bow's "puffy" parts. I made enough passes (3 1/2) to make 7 puffy loops for my bow.  


Fold the long looped ribbon in half. 


Cut at the fold as shown.  


Put wire through the fold and twist once.


Place a long strip of ribbon in for the tail and twist twice this time. 


Start pulling the puffy loops apart and into the center to make a full bow. 


At this point, I always realize that I still never leave space for the bow.... so I take out two more stems of flowers or "greenery" and then make a space for the bow. This was extra important for this craft because I want to see enough of the "vase" for others to see that it is a pumpkin. If this was just a boring box, bowl, or vase, I may not care as much about where the bow goes in the arrangement. 

AND FINE! you have made your craft pumpkin fall floral arrangement! :) 


DONE! This arrangement now enjoys a spot on top of my wine cabinet as I showed you before in a previous blog! :)


Gonna try this??? email me your results! I love to see what others have created! missmidwestmn@hotmail.com 


In the Holiday Spirit!

The fall and Hallowe'en season give me such great opportunities to work on some great floral crafts and things that are a little whimsical too!

The best part about crating is all the stuff you can make for your home! 

My house looks like this right now: 

My wine cabinet with a few of my decorated wine glasses and a FUNKIN pumpkin with a floral arrangement in it.
I am going to show you all that craft later step by step!


My mantle in our living room. I made the "EEK" apothecary jars from candle holders and  spaghetti jars. MARTHA STEWART has awesome Hallowe'en caution tape that I used and fun labels for wine bottles etc to give it a witching look of brews and potions. 


I love to make floral arrangements. This is one o a three piece set in my living room. the bats in it  (hard to see in this photo) are just placed in it during Hallowe'en and will come out of all my florals after the 31st. 


Witches' brooms made and decorated by me.


My front door in MARTHA STEWART tape and the wreath decorated by me in the tape, glitter spiders from Target's 1.00 bins and skulls from my CLEARANCE boxes last year. 

 THE WALK UP TO MY HOUSE:


My floral Arrangement on my center island in the kitchen. I  have a little hat on the pear in the arrangement that is just there for Hallowe'en and will come off after the 31st. It also have a few glitter bats in it that are hard to see in this photo. They are just placed in it and will also come out after the season. 


The dining room table with the 2x4 pumpkins I made at a recent Women of Today PINTEREST night, more MARTHA STEWART bottle labels, and a bat runner. 

The floral arrangement I made in my main floor bathroom. In this one, it is easy to see the bats that I add for Hallowe'en.

The decoration in the window over the sink. 


My "EEK" bottles close up!